How to run the BitBox App on NixOS
BitBox is a hardware wallet for Bitcoin. It ships with a nice app which is provided by Shiftcrypto and is available for iOS/Android and as well for Linux. On NixOS it is a bit tricky to set up but it is possible. In this article I show how to install it.
Prerequisites:
- You run NixOS
- You are familiar with how to edit your configuration.nix file
Download and Run the BitBoxApp
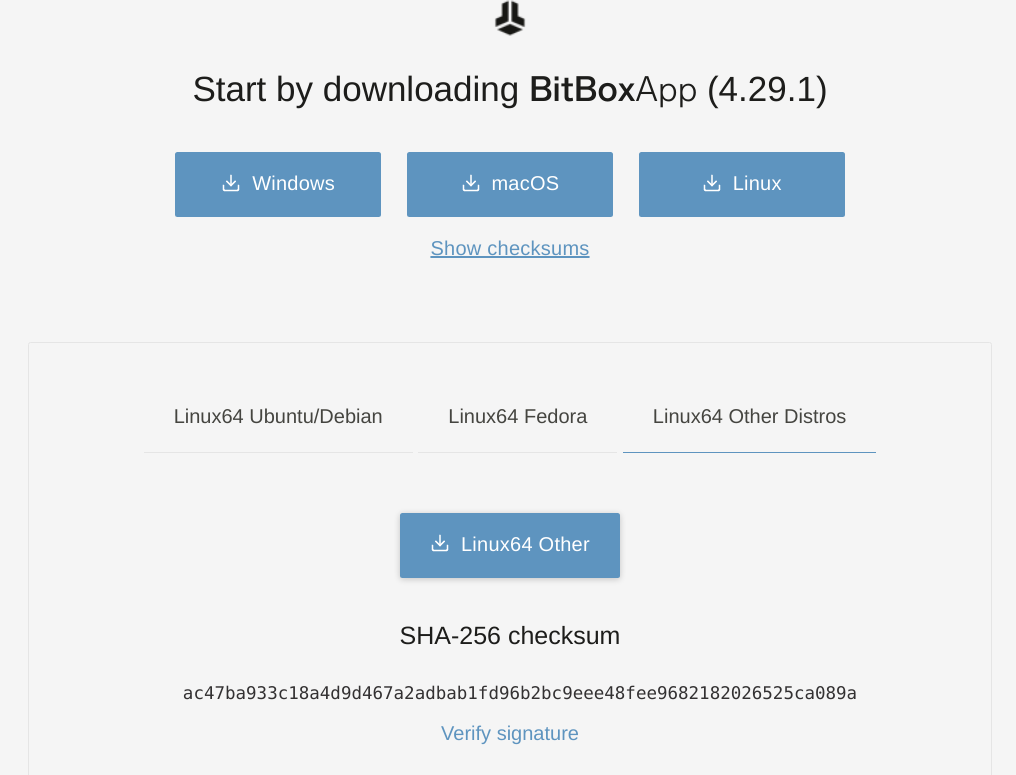
First of all, you will need to download the AppImage file from cryptshift.io download page. Select the version for other distros:
I usually place AppImage files in my ~/Apps folder, but feel free to place it anywhere you like.
According to the documentation on the download page, you can just execute the AppImage file, which wont work on NixOS. For this you will need to install appimage-run:
nix-env -iA nixos.appimage-runAfter the installation finishes we can start the app (by using the appimage guide: How to run AppImage on NixOS):
appimage-run BitBox-[version]-x86_64.AppImageNice! The app should now show up. But it will maybe not able to recognize your BitBox device. If it is the case for you, proceed to the next section.
Make your device visible to the App
On the documentation site we can see that the app may not recognize the device. And in this case it is advised to add new udev rules:
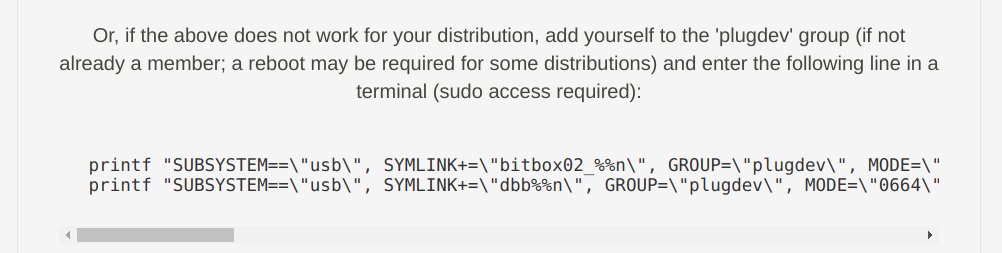
Of course this is not going to work on NixOS. So let't translate the instructions into the "Nix way".
It is advised to add your user to the plugdev group. We can achieve this by adding a new group and adding ourselves to this group in the configuration.nix file, like so:
users.users.yourUser = {
    isNormalUser = true;
    extraGroups = [ "wheel" "plugdev"]; # Adding to the group
};

# Creating the plugdev group
users.groups.plugdev = {};
Next, we need to add udev rules. For this, we can collect all printf commands from the instructions and put them into the udev.extraRules section in our configuration.nix file:
  services.udev.extraRules = ''
    SUBSYSTEM=="usb", SYMLINK+="bitbox02_%n", GROUP="plugdev", MODE="0664", ATTRS{idVendor}=="03eb", ATTRS{idProduct}=="2403"
    KERNEL=="hidraw*", SUBSYSTEM=="hidraw", SYMLINK+="bitbox02_%n", GROUP="plugdev", MODE="0664", ATTRS{idVendor}=="03eb", ATTRS{idProduct}=="2403"
    SUBSYSTEM=="usb", SYMLINK+="dbb%n", GROUP="plugdev", MODE="0664", ATTRS{idVendor}=="03eb", ATTRS{idProduct}=="2402"
    KERNEL=="hidraw*", SUBSYSTEM=="hidraw", SYMLINK+="dbbf%n", GROUP="plugdev", MODE="0664", ATTRS{idVendor}=="03eb", ATTRS{idProduct}=="2402"
'';
And there you have it. Just rebuild your configuration and you are ready to go. Plug-In your BitBox device and start the App afterwards. It should now recognize your device.
Thank you for reading this far! Let’s connect. You can @ me on X (@debilofant) with comments, or feel free to follow. Please like/share this article so that it reaches others as well.